
The editor
Write LaTeX, Typst, and Markdown with source and visual editing, document tools, and a PDF beside your draft.
このコンテンツはまだ日本語訳がありません。
Oleafly brings source editing, document navigation, and PDF preview into one workspace. Its CodeMirror editor supports LaTeX, Typst, and Markdown. Line numbers, bracket matching, and an active-line highlight are always on. Long lines wrap unless you turn off Wrap long lines in Settings → Appearance → Editor.
Shortcuts below show the macOS key first; on Windows and Linux, read ⌘ as Ctrl.
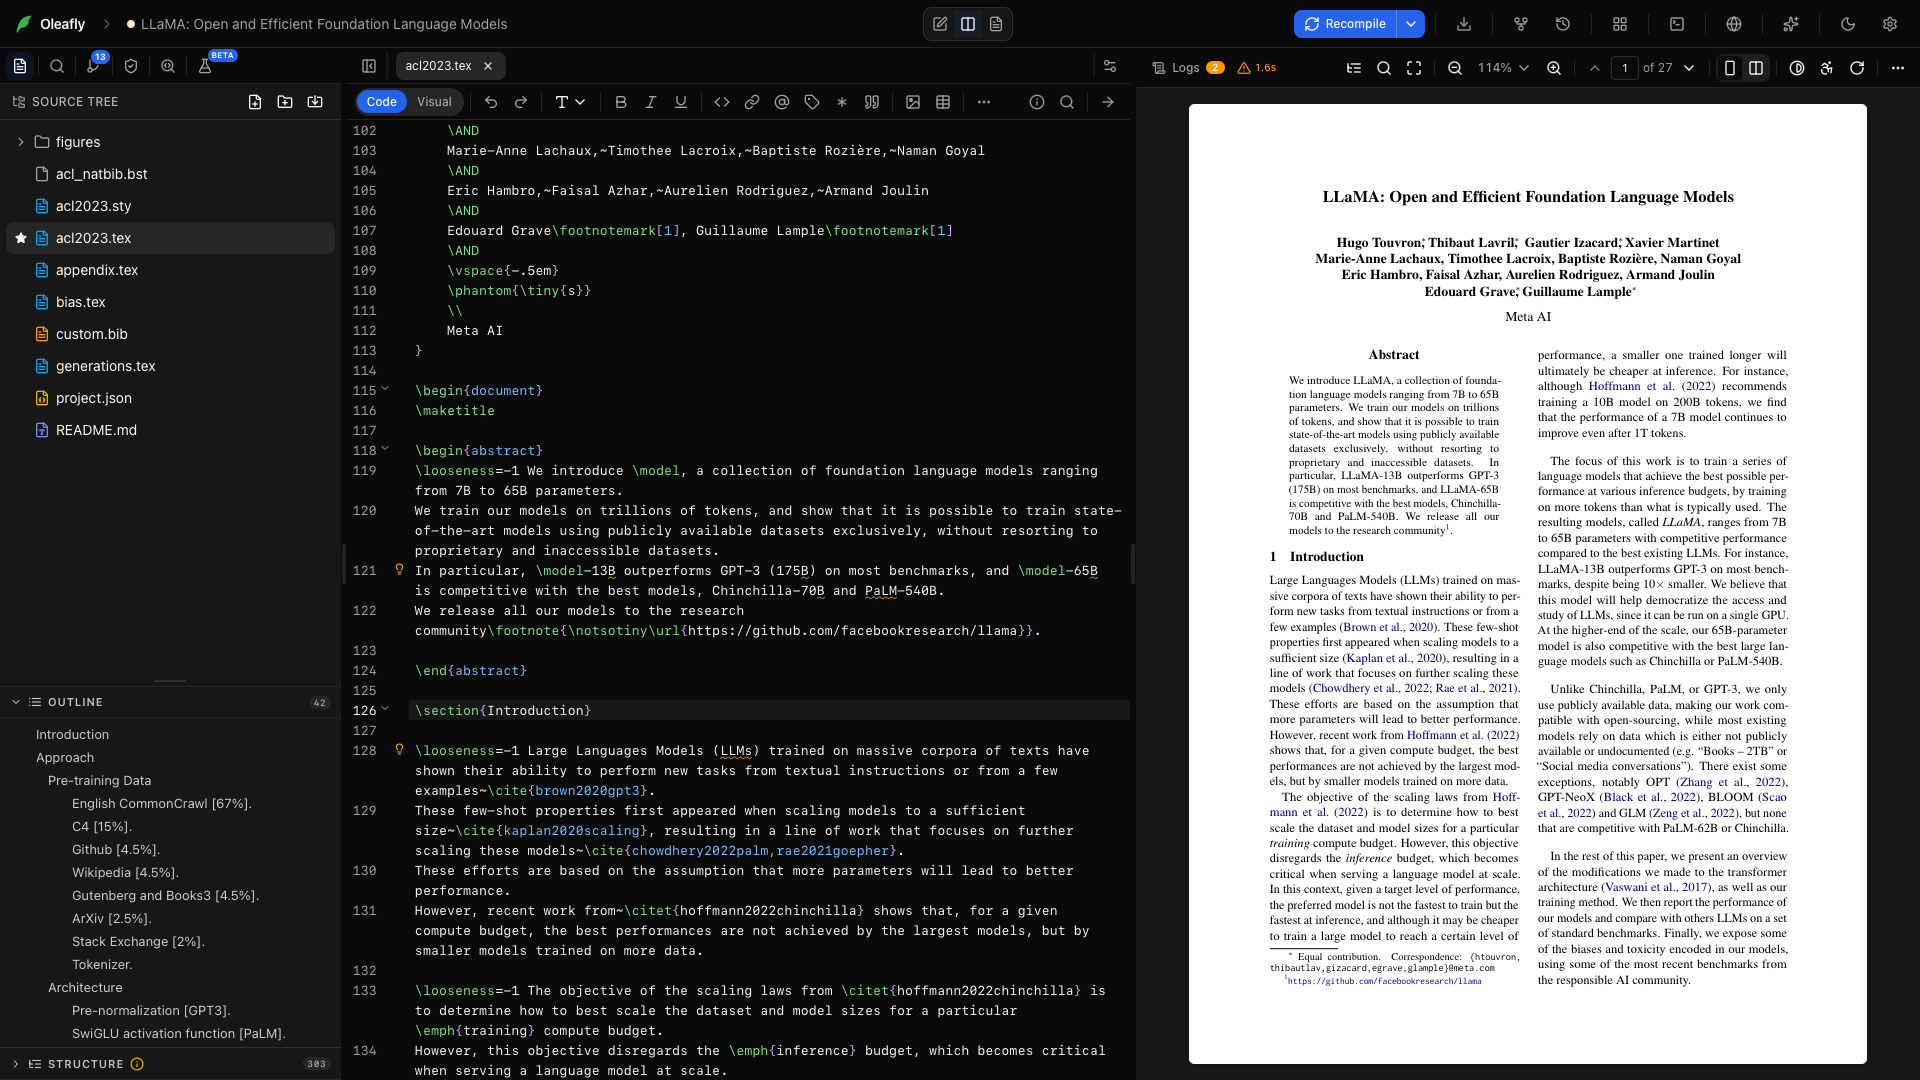
Choose your writing guide
Section titled “Choose your writing guide”Each document engine has its own toolbar and source syntax. These guides explain every control and include a manuscript you can paste and compile:
The editor toolbar
Section titled “The editor toolbar”All three toolbars use the same layout:
- Code / Visual comes first and switches the open file between source and visual editing.
- Undo and Redo come next. Each one is greyed out when there is nothing to undo or redo.
- The formatting and insert buttons fill the middle. Buttons that don’t fit move into More formatting options (
…) at any width, so a narrow editor never loses a control. - The right end keeps the document tools in view: LaTeX packages or Typst packages (see Packages), Document insights, Document settings, Project info, Find, and Go to PDF.
Markdown has no packages button. You can also open these tools from the ⌘K palette: Browse LaTeX packages, Browse Typst packages, Document insights, and Document settings.
Keep your place
Section titled “Keep your place”Sticky context keeps the enclosing section or environment visible as you scroll. In Typst files, the headings above the cursor stay pinned the same way. Sticky scroll in Settings → Appearance → Editor turns it off.
A breadcrumb bar above .tex and .typ files names the file and the sections the cursor is in. Click a crumb to jump to that heading. The project outline helps you move between chapters, while reference and citation navigation take you to the source behind a symbol. Autocomplete includes package-aware LaTeX commands, math input, and citation details.
Each sidebar view remembers its scroll position, expanded folders, and open sections for each project, so you come back to the same spot.
Zen mode
Section titled “Zen mode”Zen mode hides the project toolbar, the sidebar, the assistant, the terminal, and the editor’s own tabs and formatting bar. Only your writing is left, and the editor keeps its full width.
Press Ctrl+⌘⇧F on macOS or Shift+F11 on Windows and Linux to turn it on. You can also choose Zen Mode in the project toolbar’s Layout menu or the macOS View menu, or run Toggle Zen Mode from the ⌘K palette. Press the same key again, or Esc twice, to leave.
In Zen mode the Compile button sits in the top right corner, over the PDF when it is open, and it shows when the pointer comes near. A small pill there says Compiling during a build. After a failed build it reads Compile failed, and clicking it shows or hides the compile log. ⌘↵ still compiles, and ⌘⌥P shows or hides the PDF without leaving Zen mode.
Two options live under Settings → Appearance → Project. Go full screen fills the screen while Zen mode is on. Show the PDF when you compile opens the PDF beside the editor each time you compile while it’s hidden. The key itself can be changed in Settings → Keyboard Shortcuts.
Themes, colors, and fonts
Section titled “Themes, colors, and fonts”The editor uses one theme while the app is light and another while it is dark. Pick both, change the color of any part of the source, and choose the editor font, size, line height, letter spacing, and cursor under Settings → Appearance → Editor. Colors follow roles that mean the same thing in LaTeX, Typst, and Markdown. In LaTeX, a section command and its title both use the heading color, citation keys and environment names take the color of their command, and math is one color. Markdown citations such as [@key] and @key are highlighted as citations, not as links.
Find and replace
Section titled “Find and replace”Press ⌘F for a VSCode-style widget in the top-right corner of the editor:
- Match case (
Aa), whole word (ab), and regular expression (.*) toggles - A live match counter (
3 of 41), withNo resultsandInvalidstates, capped at2000+for huge documents - Enter jumps to the next match, Shift+Enter to the previous, Esc closes
- Select all matches turns every match into a cursor for simultaneous editing
- The chevron expands the Replace row: replace next, replace All, and a Preserve case toggle that maps the original token’s casing onto the replacement (so replacing
figurewithimagealso turnsFigureintoImage)
⌘A selects the whole file, including the lines scrolled out of view, so a copy or delete after it takes everything.
Code folding
Section titled “Code folding”Click the arrow in the gutter to fold.
- In LaTeX, a
\begin…\endenvironment folds as one block (nesting-aware), and a section folds until the next section of the same or higher level. - In Typst, a heading folds until the next heading of the same or higher level. Code blocks in
{…}, content blocks in[…], argument lists, equations, raw blocks, and block comments fold too.
Fold a chapter while you edit a later one.
Comment out lines
Section titled “Comment out lines”Press ⌘/ to comment or uncomment the current line or the selected lines. LaTeX lines get % and Typst lines get //. Outside the editor, the same key opens the shortcut reference.
Multi-cursor and block selection
Section titled “Multi-cursor and block selection”The editor supports multiple selections: Alt-drag for a rectangular (column) selection, and Select all matches in the find widget for one cursor per match. Every cursor types, deletes, and pastes together.
Indentation and brackets
Section titled “Indentation and brackets”The editor indents as you type, four spaces per level unless you change Tab size in Settings → Appearance → Editor. Tab indents, or accepts the open autocomplete suggestion. Brackets and quotes auto-close, backspace removes pairs together, and the matching bracket highlights at the cursor.
Typst typing aids
Section titled “Typst typing aids”Typst files have a few helpers of their own:
- Type
$and the closing$comes with it. Press Space inside the empty pair to turn it into display math,$ … $. Backspace in an empty pair removes both signs. - Select some text and type
*,_,`or$to wrap it as strong text, emphasis, raw text, or math. - On a list item, Enter starts the next item with the same marker (
-,+,/, or a number). Shift+Enter starts a new line inside the item, and Backspace right after an empty marker removes it. Tab nests the item one level deeper and Shift+Tab moves it back out. - Type
/at the start of a line or after a space to open Typst snippets: heading, figure, table figure, table, equation, numbered equation, footnote, quote, code, outline, bibliography, page break, columns, grid, link, and the three kinds of list. - ⇧⌥F (Shift+Alt+F) formats the file with typstyle. Turn on Format on save under Typst in Settings → Appearance → Editor to format every time you press ⌘S. Autosave never reformats.
$ pairing needs both Auto-close brackets and Auto-close math, and wrapping a selection needs Auto-close brackets. Both switches are in Settings → Appearance → Editor. The list keys are always on. Completion, rename, Go to definition, and signature help come from the Typst language server; see Autocomplete and Code intelligence.
Insert figures, tables, and references in Typst
Section titled “Insert figures, tables, and references in Typst”Typst has the same insertion tools as LaTeX, and each one writes Typst. They are on the Typst toolbar and in the editor’s right-click menu:
- Insert figure opens the figure dialog. Pick an image from the project or import one, then set its width, caption, label, alt text, and placement. With the cursor inside an existing
#figure, the same button opens Edit figure so you can change any of those. - Paste or drop an image file into the editor. Oleafly saves it to
figures/when the project has that folder, or next to the main document otherwise, and inserts a figure that uses it. - Insert table adds an empty table of the size you pick. Table from CSV/XLSX… in the right-click menu imports a CSV, TSV, Excel, or JSON file, with an optional caption and label. Switch on Keep linked to the data file and Oleafly copies the data into the project’s
datafolder. The table reads that file on every compile, so when you edit the data, the table follows. - Cite from project writes
@keyfor an entry in the project’s bibliography. If the document has no#bibliographyyet, Oleafly adds one. - Add label puts a label on the heading, figure, or equation at the cursor, or selects the label it already has. Insert cross-reference lists the project’s labels and writes
@label. - The math buttons insert inline math, a display equation, a numbered equation with a label, or aligned equations. If the document has no equation numbering rule, a note offers Add rule.
- Symbols inserts each symbol under its Typst name.
Write in Typst covers each toolbar button.
Visual editing
Section titled “Visual editing”Every LaTeX, Typst, and Markdown file has a Code / Visual switch at the start of its toolbar. New projects open in Code, and each project remembers the mode you left it in. Markdown also has Both, which shows the source and the formatted text stacked or side by side.
In LaTeX and Typst, Visual mode is the same editor with the markup drawn in place. Put the cursor in a heading, an equation, or a command and its source comes back on that line. Move away and the rendered form returns. The file is still the only copy, so line numbers, folding, find and replace, spelling, and compile errors keep working. Every toolbar button writes the same source it writes in Code mode.
In a Typst file, Visual mode shows:
- headings, strong and emphasized text, raw text, links, and colored text
- bulleted, numbered, and term lists with their markers
- inline and display math, drawn by Typst
- images and figures, with the caption as plain text
- tables as a grid you can type into. Select a cell and a toolbar appears for borders, alignment, adding or deleting rows and columns, and removing the table.
- references and citations as chips, and footnotes as a small marker
The #set, #show, #import, and #let lines at the top of a Typst file collapse into a Show document settings bar. Click it to open them in place. The LaTeX preamble collapses the same way.
Visual mode suits a prose pass. Switch to Code for structure or custom commands. Anything Visual mode can’t draw stays on screen as editable source.
Math preview
Section titled “Math preview”With the cursor inside an equation, the rendered result appears just above it. KaTeX draws LaTeX math, and Typst draws Typst math. The preview’s menu can hide it until you leave the equation, or switch it off. Math preview in Settings → Appearance → Editor turns it back on.
Paste LaTeX math into a Typst file, such as $\frac{a}{b}$ or an equation environment, and a Paste as Typst math button appears under it. Click it to swap what you pasted for Typst math, or press Esc to keep the LaTeX. For math already in the file, select it and choose Convert LaTeX math to Typst from the right-click menu.
Compile errors in the source
Section titled “Compile errors in the source”After a failed compile, each error is underlined in the file it belongs to. For Typst, the underline covers the exact span Typst reports, and an error raised inside a package points at the line in your file that called it. Hover the underline to read the message. Common Typst errors, such as an unknown name, a missing file or package, or an unclosed bracket, come with a plain explanation of what went wrong and what to check.
The Logs pane lists every error with its source line and Typst’s hints.
The built-in LaTeX linter
Section titled “The built-in LaTeX linter”The editor checks LaTeX files for structural problems as you type, before any compile:
\end{itemize}without a matching\begin, or mismatched pairs (expected \end{figure}, got \end{table})- Unclosed environments
- Duplicate
\label{}keys - An odd number of
$on a line (almost always a forgotten math delimiter)
Errors get red squiggles, warnings amber, with markers in the gutter. The linter reads only LaTeX, so it never stops a Typst or Markdown compile. Compile errors from the actual LaTeX run appear separately in the Logs pane, and Preflight adds its own source-level checks inline.
Word count
Section titled “Word count”Run Word count from the ⌘K palette for words, characters, and lines in the active file. Typst files are counted by Typst’s rules, so code and comments stay out of the total.
Vim and Emacs keys
Section titled “Vim and Emacs keys”Pick Vim or Emacs under Keybindings in Settings → Appearance → Editor, or run Enable vim mode from the ⌘K palette. Vim gives you hjkl, operators and text objects (dd, ciw), :w, and visual mode. The change applies right away, and the Oleafly shortcuts on this page keep working alongside it.
More than .tex
Section titled “More than .tex”Files open with highlighting matched to their extension: BibTeX, Markdown, JSON, YAML, TOML, CSS, shell scripts, and more. Images and PDFs open as rendered views instead of text, and binary formats are protected from accidental corruption; see Files & folders.
If a file changes on disk while you have unsaved edits in it, a banner names the file and offers Compare, Keep mine, and Reload. LaTeX, Typst, and Markdown files all get it.
Related pages
Section titled “Related pages”- Autocomplete & slash commands: completion for commands, references, citations, and the
/insert menu - Code intelligence: jump-to-definition, rename, hover cards, math preview
- Spelling & grammar: offline Hunspell and Harper checking that understands LaTeX
- Packages, Document insights, and Document settings: the document tools at the right of the toolbar
- Keyboard shortcuts: the complete reference
- Inline AI edits: press ⌘L on a selection and describe the change