
Writing in each language
Write in Typst
Write a Typst paper, report, or resume in Code or Visual mode, with a toolbar that writes the Typst for you.
Choose a Typst template and edit its .typ source beside the compiled PDF. The toolbar writes Typst syntax for you, so every change stays in the source where you can read and edit it. When you’d rather not look at the markup, switch the file to Visual mode.
Compile a small report
Section titled “Compile a small report”- Choose New project → Use a template → Blank Typst document.
- Name it Measurement note and open
main.typ. - Paste the example below, then choose Recompile or press ⌘Enter / Ctrl+Enter.
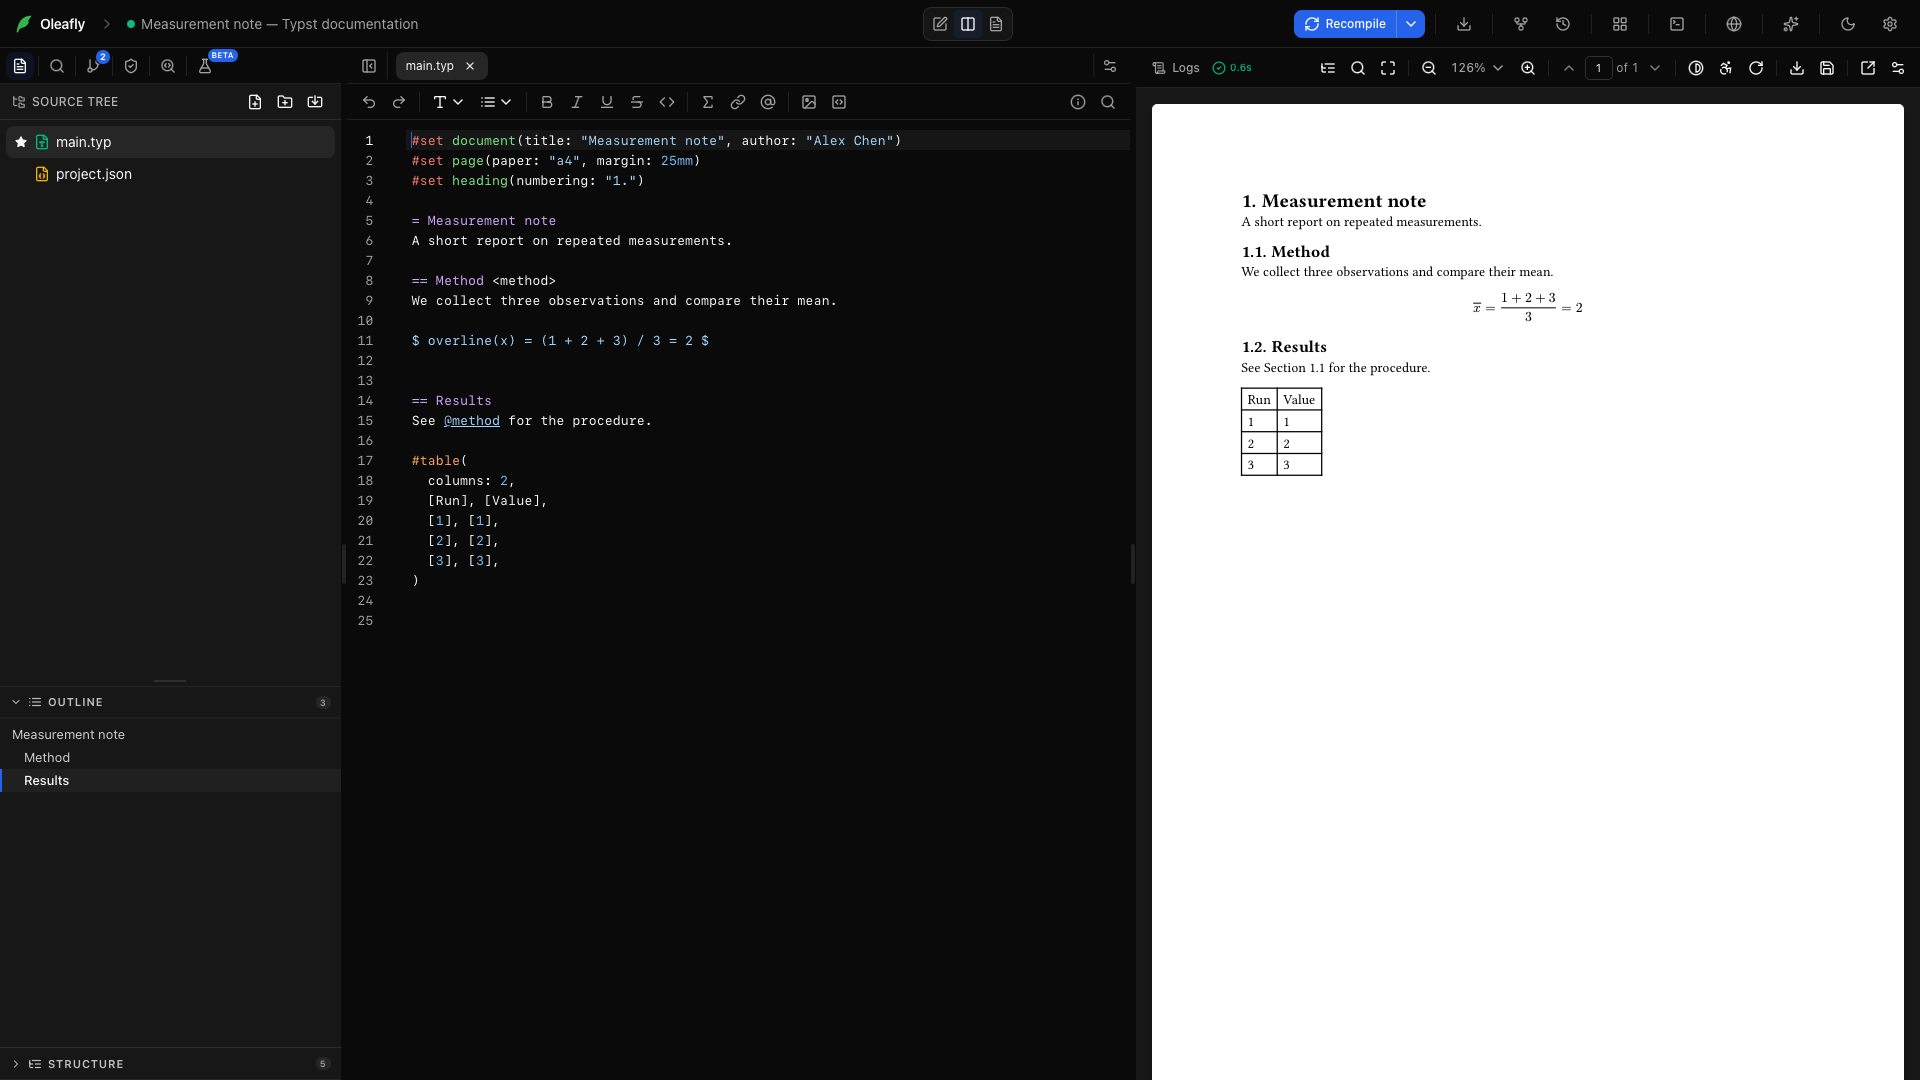
#set document(title: "Measurement note", author: "Alex Chen")#set page(paper: "a4", margin: 25mm)#set heading(numbering: "1.")
= Measurement noteA short report on repeated measurements.
== Method <method>We collect three observations and compare their mean.
$ overline(x) = (1 + 2 + 3) / 3 = 2 $
== ResultsSee @method for the procedure.
#table(  columns: 2,  [Run], [Value],  [1], [1],  [2], [2],  [3], [3],)
The PDF should show numbered headings, a display equation, a reference to the method, and a two-column table.
To see the PDF change as you type, open the arrow beside Recompile and set Auto compile to On. In a Typst project that is the live preview. See Live preview with Auto compile.
Every toolbar tool
Section titled “Every toolbar tool”Select text before using a formatting tool to wrap that text. With no selection, the toolbar inserts a placeholder you can type over. When the editor is too narrow for every button, the ones that don’t fit move into More formatting options (…). Most of these tools are also in the editor’s right-click menu.
Code / Visual
Section titled “Code / Visual”The switch at the start of the toolbar changes how the file is shown. Code shows the Typst source. Visual draws headings, emphasis, lists, math, images, tables, references, and footnotes in place, and brings back the source on the line where your cursor is. The file is the same in both modes. Visual mode in Typst has the details.
Reverse your latest edit. ⌘Z / Ctrl+Z. The button is greyed out when there is nothing to undo.
Reapply an undone edit. ⌘Shift+Z / Ctrl+Shift+Z.
Heading → Title
Section titled “Heading → Title”Select a title and choose Title. = Title.
Heading → Section
Section titled “Heading → Section”Add a section within the document. == Section.
Heading → Subsection
Section titled “Heading → Subsection”Add a level below a section. === Subsection.
Heading → Subsubsection
Section titled “Heading → Subsubsection”Add a fourth-level heading. ==== Subsubsection.
Heading → Minor heading
Section titled “Heading → Minor heading”Add a fifth-level heading. ===== Minor heading.
Heading → Paragraph heading
Section titled “Heading → Paragraph heading”Add a sixth-level heading. ====== Paragraph heading.
Select “three observations”. *three observations*; ⌘B / Ctrl+B.
Italic
Section titled “Italic”Select a term to emphasize. _term_; ⌘I / Ctrl+I.
Underline
Section titled “Underline”Select a phrase. #underline[phrase].
Strikethrough
Section titled “Strikethrough”Mark an obsolete phrase. #strike[phrase].
Inline code
Section titled “Inline code”Select a filename or variable name. Surrounds it with backticks.
Insert link
Section titled “Insert link”Replace url, then text. #link("url")[text].
Cite from project
Section titled “Cite from project”Search the project’s bibliography by key, author, or title, and pick an entry. Oleafly writes @key. If the document has no #bibliography call yet, Oleafly adds one. Find and add a new citation… at the bottom of the list opens the search for a new source. See Add citations.
Insert cross-reference
Section titled “Insert cross-reference”Pick a label from the project’s list to write @label. In the example, choose method to get @method. Add a label here puts a new label on the item at the cursor instead.
Add label
Section titled “Add label”Put the cursor in a heading, figure, or equation and choose Add label. On the Results heading in the example, Oleafly adds <sec:results>. If the item already has a label, the button selects it.
Insert footnote
Section titled “Insert footnote”Place the cursor after a word. #footnote[note text].
Insert blockquote
Section titled “Insert blockquote”Place the cursor on a new line. #quote(block: true)[quote].
Insert figure
Section titled “Insert figure”Opens the figure dialog. Pick an image from Project images or choose Import from disk…, then set its width, caption, label, alt text, and placement. With the cursor inside an existing #figure, the same button opens Edit figure so you can change any of those. See Add a captioned figure.
Insert table
Section titled “Insert table”Open the grid and pick the number of rows and columns. Oleafly inserts a #figure holding a table with a header row and top, middle, and bottom rules, plus caption: [Caption] and the label <tab:label>. Replace the caption, the label, and the empty cells. To build a table from a spreadsheet instead, see Tables from data files.
Insert image
Section titled “Insert image”Import an image, then replace the selected filename with its relative path. #image("image-filename"). You can also paste or drop an image file into the editor, and Oleafly saves it to the project and inserts a figure that uses it.
Draw a diagram
Section titled “Draw a diagram”Opens the diagram composer in Typst mode. Draw on the canvas or edit the fletcher code, then choose Insert as Typst to put the diagram at the cursor. The first preview downloads the fletcher package from Typst Universe, so you need to be online for it.
Image to Typst
Section titled “Image to Typst”Choose a screenshot of an equation or some text, and it’s transcribed into Typst at the cursor. It uses the model for Tools, a local Ollama model unless you pick another. If you haven’t picked one and Ollama isn’t running or has no model that reads images, it uses the assistant’s model instead, and the image goes to that provider. Check the result and compile it.
List → Bulleted list
Section titled “List → Bulleted list”Start a list of observations. - Item.
List → Numbered list
Section titled “List → Numbered list”Start a sequence of steps. + Item.
Select x and click the math icon. $x$.
Display equation
Section titled “Display equation”An equation on its own line. $ x $, with a space inside each $.
Numbered equation
Section titled “Numbered equation”A display equation with a label, such as $ x $ <eq:label>. Typst numbers equations only when the document has a numbering rule. If yours has none, a note offers Add rule, which adds #set math.equation(numbering: "(1)") near the top of the file.
Aligned equations
Section titled “Aligned equations”Several equations aligned at &, with \ between rows. $ a &= b \ c &= d $.
Fraction
Section titled “Fraction”Inserts frac(a, b), wrapped in $ when the cursor isn’t already in math. With text selected, the selection becomes the numerator.
Symbols
Section titled “Symbols”Open the symbol picker, search for a symbol, and select it. Oleafly writes it under its Typst name: arrow.r inside math, or #sym.arrow.r in running text.
Code block
Section titled “Code block”Select several lines of code or replace the placeholder. A block enclosed by triple backticks. Add a language after the opening fence for highlighting.
Code intelligence → Go to definition
Section titled “Code intelligence → Go to definition”Put the cursor on a label, variable, or function and choose the action, or press F12. Opens where it is defined, even in another file.
Code intelligence → Find references
Section titled “Code intelligence → Find references”Lists every place a label, variable, or function is used. ⇧F12.
Code intelligence → Rename symbol
Section titled “Code intelligence → Rename symbol”Renames a label, variable, or function across the project. F2. Code intelligence covers all three.
Typst packages
Section titled “Typst packages”The package icon at the right end of the bar searches Typst Universe and inserts an #import line. More under Packages, settings, and insights.
Document insights
Section titled “Document insights”Lists the document’s headings, figures, tables, equations, labels, citations, and to-dos, with each one linked to its line. See Document insights.
Document settings
Section titled “Document settings”Changes page size, margins, font, language, justification, line spacing, and numbering by editing the document’s #set rules. See Document settings.
Project info
Section titled “Project info”Shows word, figure, and math counts for the document and for any selection, plus proofreading results.
Search for a word in the active file. ⌘F / Ctrl+F.
Go to PDF
Section titled “Go to PDF”Jumps from the cursor to the matching place in the compiled PDF. The button appears on Typst 0.13 and later. See Jump between the source and the PDF.
Visual mode
Section titled “Visual mode”Switch the toolbar from Code to Visual in any .typ file. Visual mode is the same editor with the markup drawn in place:
- headings, strong and emphasized text, raw text, links, and colored text
- bulleted, numbered, and term lists with their markers
- inline and display math, drawn by Typst
- images and figures, with the caption shown as text
- tables as a grid you can type into. Select a cell to get a small toolbar for borders, alignment, rows, and columns.
- references and citations as chips, and footnotes as a small marker
Put the cursor on a line and its source comes back so you can edit it. Move away and the rendered form returns. The #set, #show, #import, and #let lines at the top of the file fold into a Show document settings bar, which you can click to open. Anything Visual mode can’t draw stays on screen as source. Every toolbar button writes the same Typst in both modes, and line numbers, find, spelling, and compile errors keep working.
New projects open in Code, and each project remembers the mode you left it in. Visual editing covers the switch for all three languages.
Help while you type
Section titled “Help while you type”Typst files get the same helpers as LaTeX files, written for Typst syntax:
- Click the arrow in the gutter to fold a heading down to the next heading of the same level. Code blocks, content blocks, equations, and long argument lists fold too. See Code folding.
- As you scroll, the headings above the cursor stay pinned at the top of the editor. A breadcrumb bar above the file names the section you’re in, and clicking a crumb jumps to that heading.
- Typing
$adds the closing$, and a space inside the empty pair turns it into display math. On a list item, Enter starts the next item. Typst typing aids lists the rest. - The Typst language server completes functions, file paths, labels, citation keys, packages, and bibliography styles. See Typst completion.
- Type
/at the start of a line, or after a space, for snippets: headings, figures, tables, equations, footnotes, an outline, a bibliography, and more. - ⌘/ / Ctrl+/ comments or uncomments the selected lines with
//.
Math preview
Section titled “Math preview”With the cursor inside an equation, Typst draws the result just above it. The preview’s menu can hide it until you leave the equation or turn it off.
Paste LaTeX math such as $\frac{a}{b}$ into a Typst file and a Paste as Typst math button appears under it. Click it to replace what you pasted with Typst math, or press Esc to keep the LaTeX. For LaTeX math already in the file, select it and choose Convert LaTeX math to Typst from the right-click menu. For one-off conversions, the Equation to Typst tool does the same outside a project.
Add a captioned figure
Section titled “Add a captioned figure”- Choose Insert figure on the toolbar.
- Pick
plot.pngunder Project images, or choose Import from disk… to copy it into the project. - Choose Three-quarter width, then turn on Add a caption and Add a label. Enter the caption and the label
fig:measurements. - Add Alt text that describes the image for screen readers, and pick a Placement if the figure should float to the top or bottom of the page.
- Choose Insert figure.
Oleafly writes a figure like this one:
#figure(  image("figures/plot.png", width: 75%),  caption: [Measurements across three runs.],) <fig:measurements>
See @fig:measurements for the comparison.
To change the figure later, put the cursor inside it and choose Insert figure again. The dialog opens as Edit figure with the current values.
Tables from data files
Section titled “Tables from data files”Right-click in the editor and choose Table from CSV/XLSX…. Choose a CSV, TSV, Excel, or JSON file, check the preview, and add a caption and label if you want them. Insert at cursor writes a Typst table with the same rules as the toolbar’s table. Cell text that Typst would read as markup is escaped.
Turn on Keep linked to the data file to keep the table tied to its data. Oleafly copies the data into the project’s data folder, and the table reads that file each time the document compiles. Edit the file and the table changes on the next compile. Import a table from a data file covers the dialog in full.
Add citations
Section titled “Add citations”Cite with Cite from project, or type @ and pick a key from the completion list. A citation key and a document label both use @ in Typst; the bibliography or the label supplies the target.
Put the bibliography where you want the reference list to appear:
#bibliography("references.bib")The file can be BibTeX (.bib) or Hayagriva (.yml), and the call can name a list of files. A citation you add from References & citations goes into the file the document declares, converted to Hayagriva when that file needs it. To change the reference style, use the Citation style menu at the bottom of the References panel, which writes the style: argument for you. See Choose a Typst citation style.
Packages, settings, and insights
Section titled “Packages, settings, and insights”Three buttons at the right end of the toolbar work on the whole document:
- Typst packages searches Typst Universe and writes the
#importline. When an import names an older release, the editor offers to update it. A project can also keep its own copies of its packages so it compiles offline. See Packages and Packages from Typst Universe. - Document insights lists the headings, figures, tables, equations, labels, citations, and to-dos, and copies the title, authors, keywords, and abstract for a submission form. Typst reads the document when the dialog opens, so numbers and pages are current. See Document insights.
- Document settings changes page size, margins, columns, body font, size, language, justification, line spacing, and heading and equation numbering. Oleafly writes your choices into the main file’s
#setrules. It also holds the project’s build variants. See Document settings.
Errors and checks
Section titled “Errors and checks”When a compile fails, each error is underlined in its file, over the exact span Typst reports. Hover the underline to read the message and Typst’s hints. Common errors, such as an unknown name, a missing file or package, or an unclosed bracket, come with a plain explanation. See Compile errors in the source.
Spelling & grammar check prose in Typst files, including captions, table cells, and template fields such as abstract:, and skip code. Preflight checks Typst sources for unresolved references and citations, missing alt text, missing images, document metadata, and blind-review problems.
Jump between the source and the PDF
Section titled “Jump between the source and the PDF”Choose Go to PDF on the toolbar or press ⌘⇧J / Ctrl+Shift+J to jump from the cursor to the page. In the PDF, hold ⌘ or Ctrl and click a word to jump back to its line, even in a file brought in with #include. Sync needs Typst 0.13 or later. See Source and PDF sync.
Format the file
Section titled “Format the file”Format document tidies the whole file with typstyle. Press ⇧⌥F / Shift+Alt+F or choose it from the right-click menu. Format selection formats only the selected lines. To format each time you press ⌘S / Ctrl+S, turn on Format on save under Typst in Settings → Appearance → Editor. See Format a Typst file.
Typst versions
Section titled “Typst versions”Oleafly comes with Typst 0.15.1, and Settings → Engines → Typst lists Typst 0.11 to 0.15 to download. A new project pins the default version, so its line breaks and page count stay the same when Oleafly later ships a newer Typst. To change one project’s version, open the arrow beside Recompile and choose under Typst version (this project). The language server follows the project’s version. Typst versions explains pins, missing versions, and how to test a newer release before you switch.
Organize and export
Section titled “Organize and export”Split a long report into files and include them with #include "sections/method.typ". Keep figures, data, fonts, and bibliography files within the project so a source ZIP travels with everything the document needs.
Compile to check the result, then open Export. It offers Export as PDF, Export source (.zip), Export page as PNG, and Images and HTML, which writes PNG or SVG pages or an HTML file with Typst itself. On Typst 0.13 and later, Word, HTML, Markdown, LaTeX, and plain-text exports go through Typst’s own HTML output, so equations and references survive. See Export and convert a project. Compiling explains logs and compile options, and files and folders covers project organization.
To move an existing LaTeX project to Typst, see Convert a LaTeX project to Typst.