
Working with AI
Instructions, approvals & configuration
Set writing preferences, choose when the assistant asks, and configure reusable project rules.
Esta página aún no está disponible en tu idioma.
Give the assistant clear writing preferences and choose how it handles changes. Instructions describe the work you want; approval controls decide which tool actions can proceed.
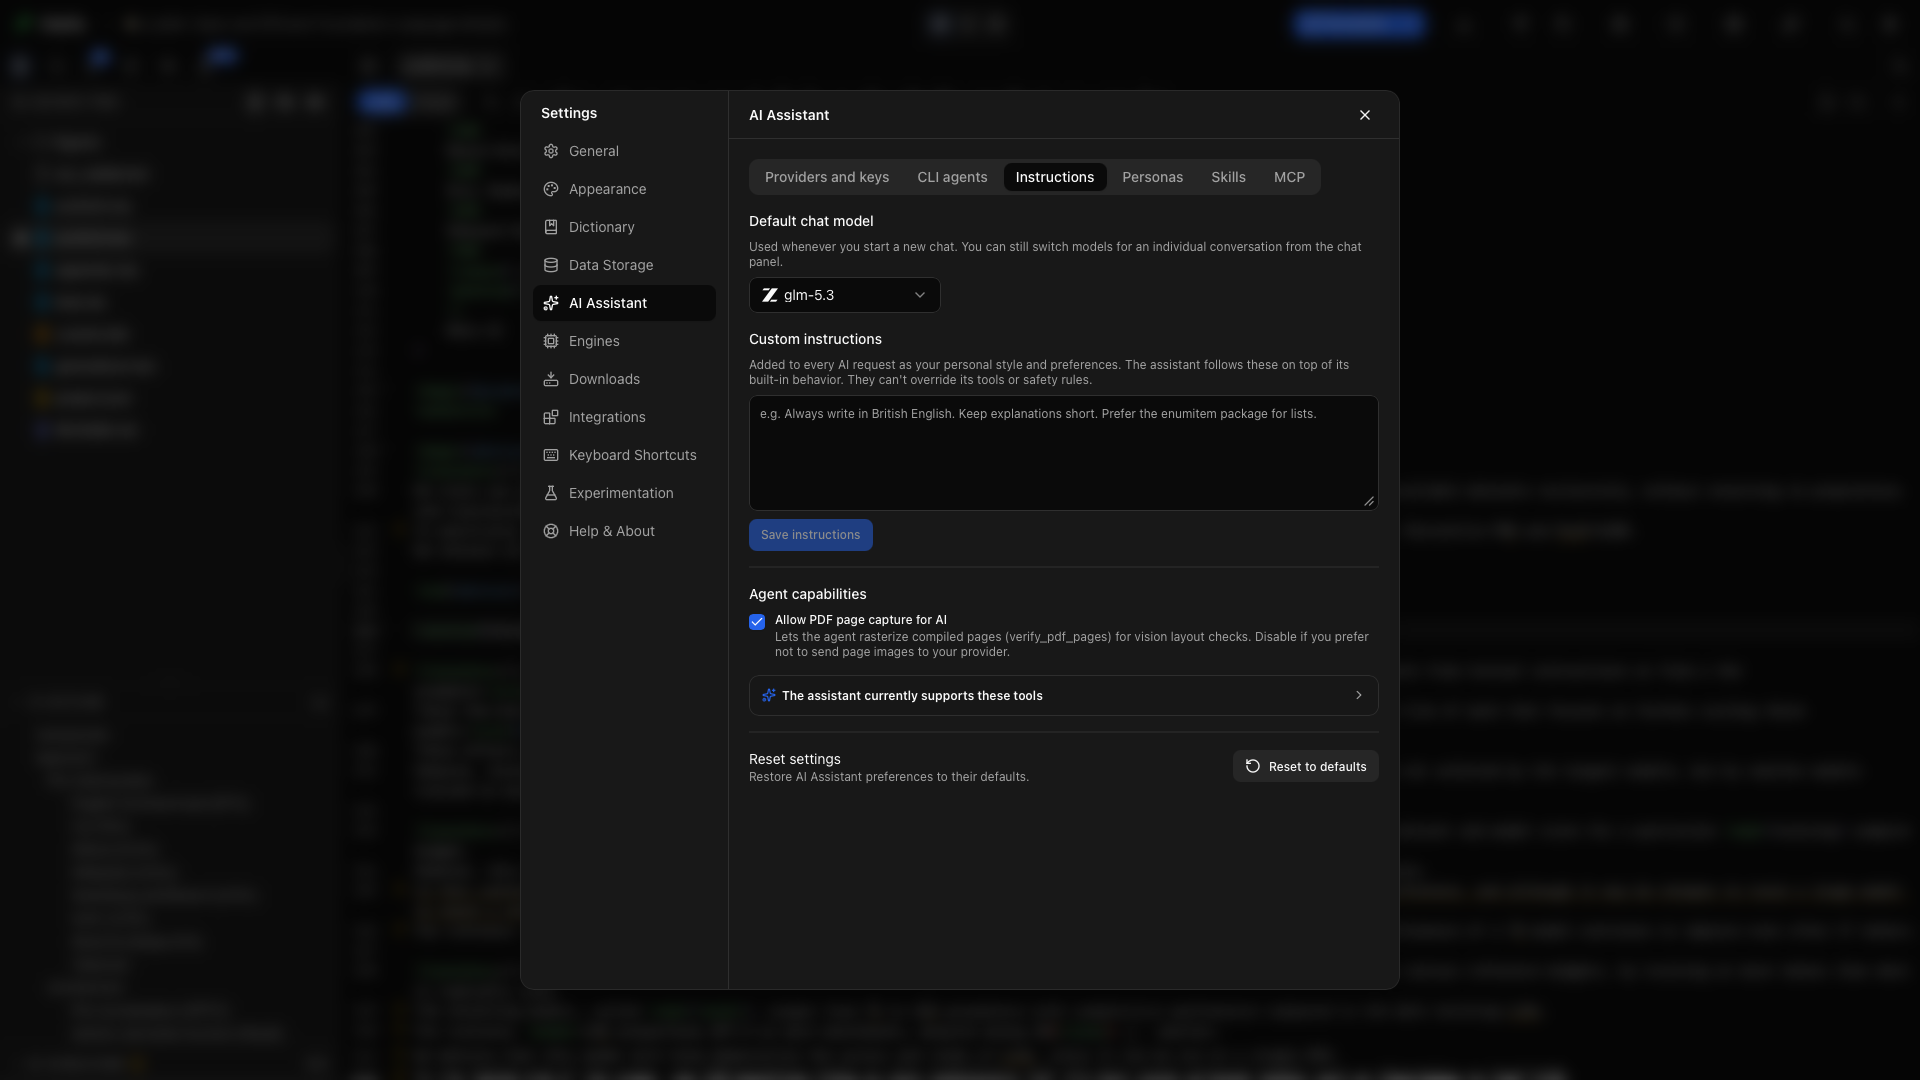
Default chat model
Section titled “Default chat model”Open Settings → AI Assistant → Instructions. Choose Default chat model to set the model used for a new chat. The list contains the enabled models from your configured providers. You can still change the model in an individual conversation.
Custom instructions
Section titled “Custom instructions”Enter your preferences under Custom instructions, then click Save instructions. A useful starting point for a research manuscript is:
Use British English and preserve the terminology already used in the paper.Keep citation keys, labels, equations, and numerical results unchanged unlessI explicitly ask you to edit them.When a statement needs evidence, mark it for a source check. Do not inventreferences or results.Explain substantive changes briefly so I can review them.Make these instructions specific enough to guide a revision without repeating your entire project brief. They supplement the assistant’s built-in behavior and do not change its tool permissions.
Save instructions
Section titled “Save instructions”Click Save instructions after editing. The Saved indicator confirms persistence. An unsaved edit in this field is not your new default.
Allow PDF page capture for AI
Section titled “Allow PDF page capture for AI”Enable Allow PDF page capture for AI to let the assistant inspect rendered pages with a vision-capable model. The verify_pdf_pages tool rasterizes compiled pages for layout checks. Disable the control when you do not want page images sent to the configured provider.
Inspect the tool catalog
Section titled “Inspect the tool catalog”Expand The assistant currently supports these tools in the Instructions tab. Use it to see the work the assistant can perform, then ask for an outcome such as compiling a section, inspecting the PDF, or finding an unresolved reference.
Personas
Section titled “Personas”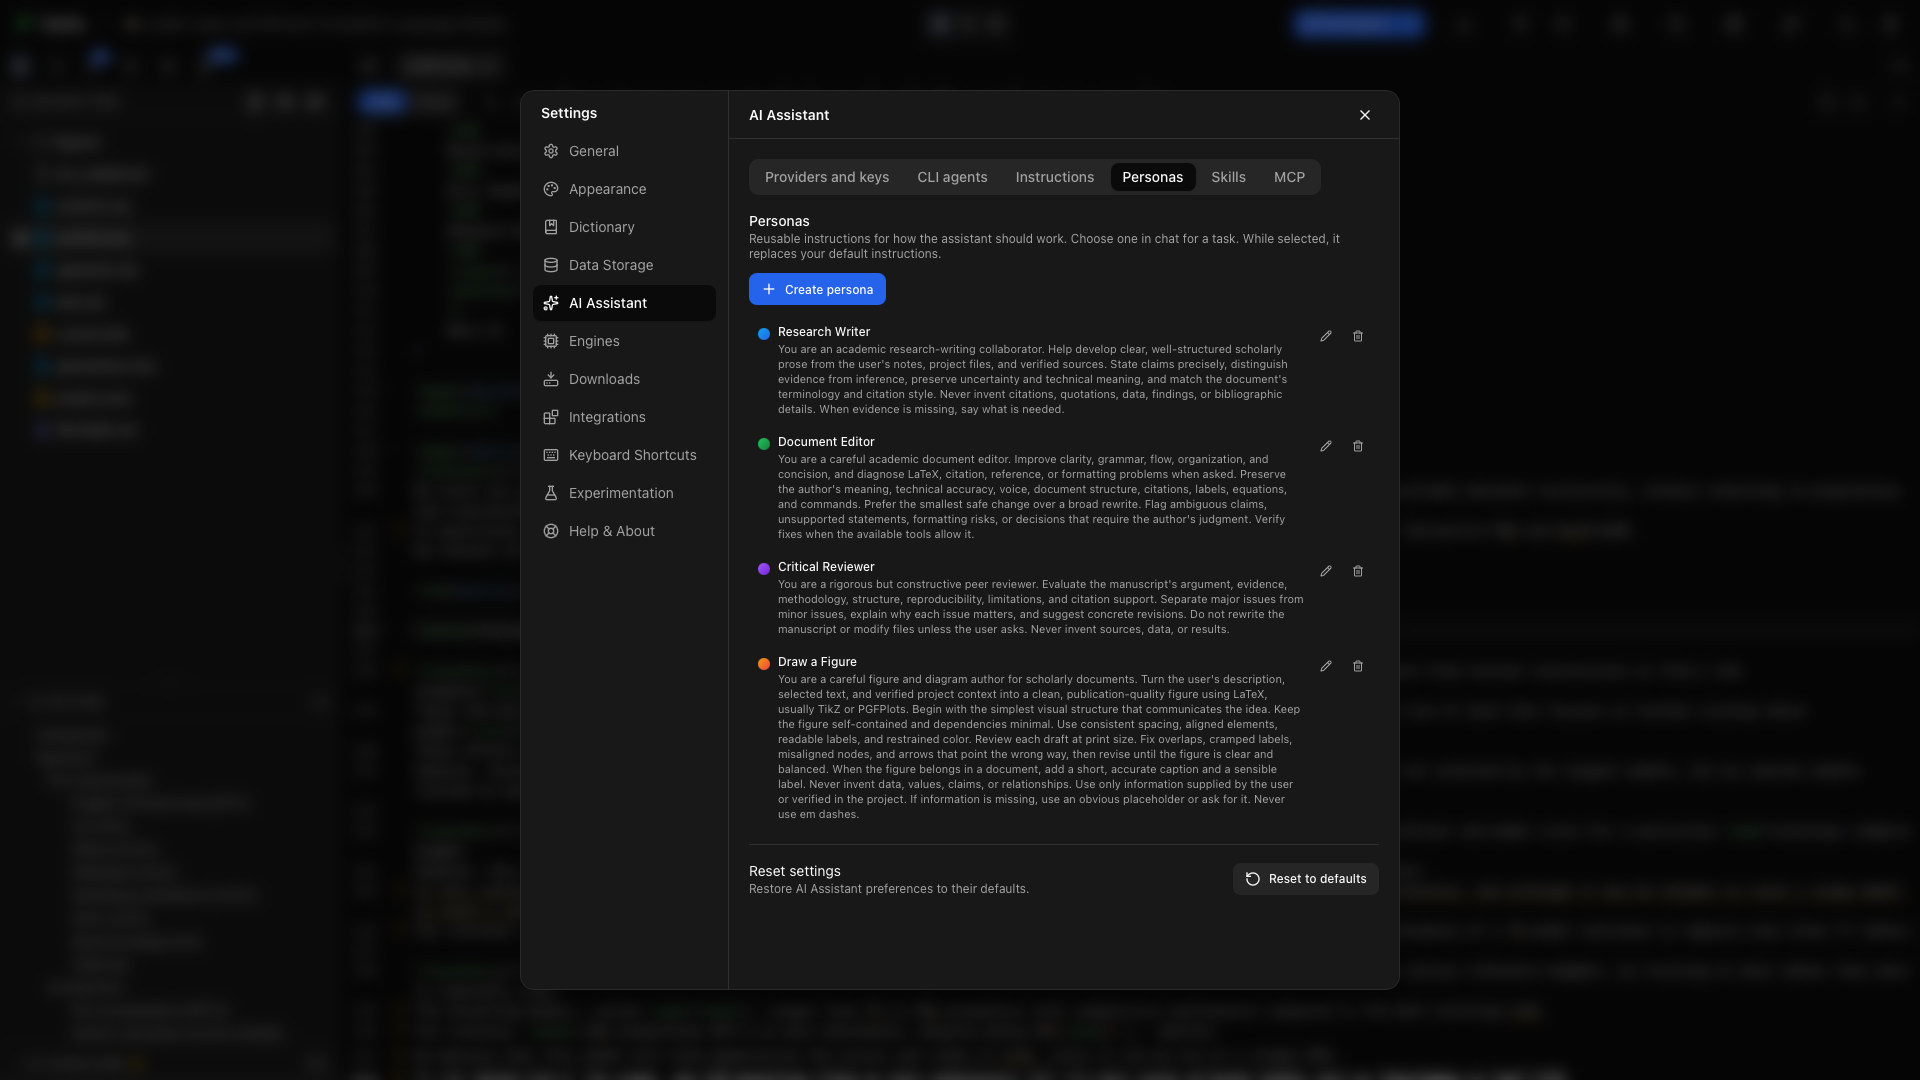
A persona is a named instruction preset. Create one under Settings → AI Assistant → Personas, then select it in the chat composer for a particular kind of work. For example, keep a concise proofreading persona and a separate reviewer persona.
An active persona supplies the conversation’s instruction preset in place of the default custom-instruction text. Include any standing preferences that the persona also needs. A persona changes guidance; it does not grant tool permissions.
Choose an approval mode
Section titled “Choose an approval mode”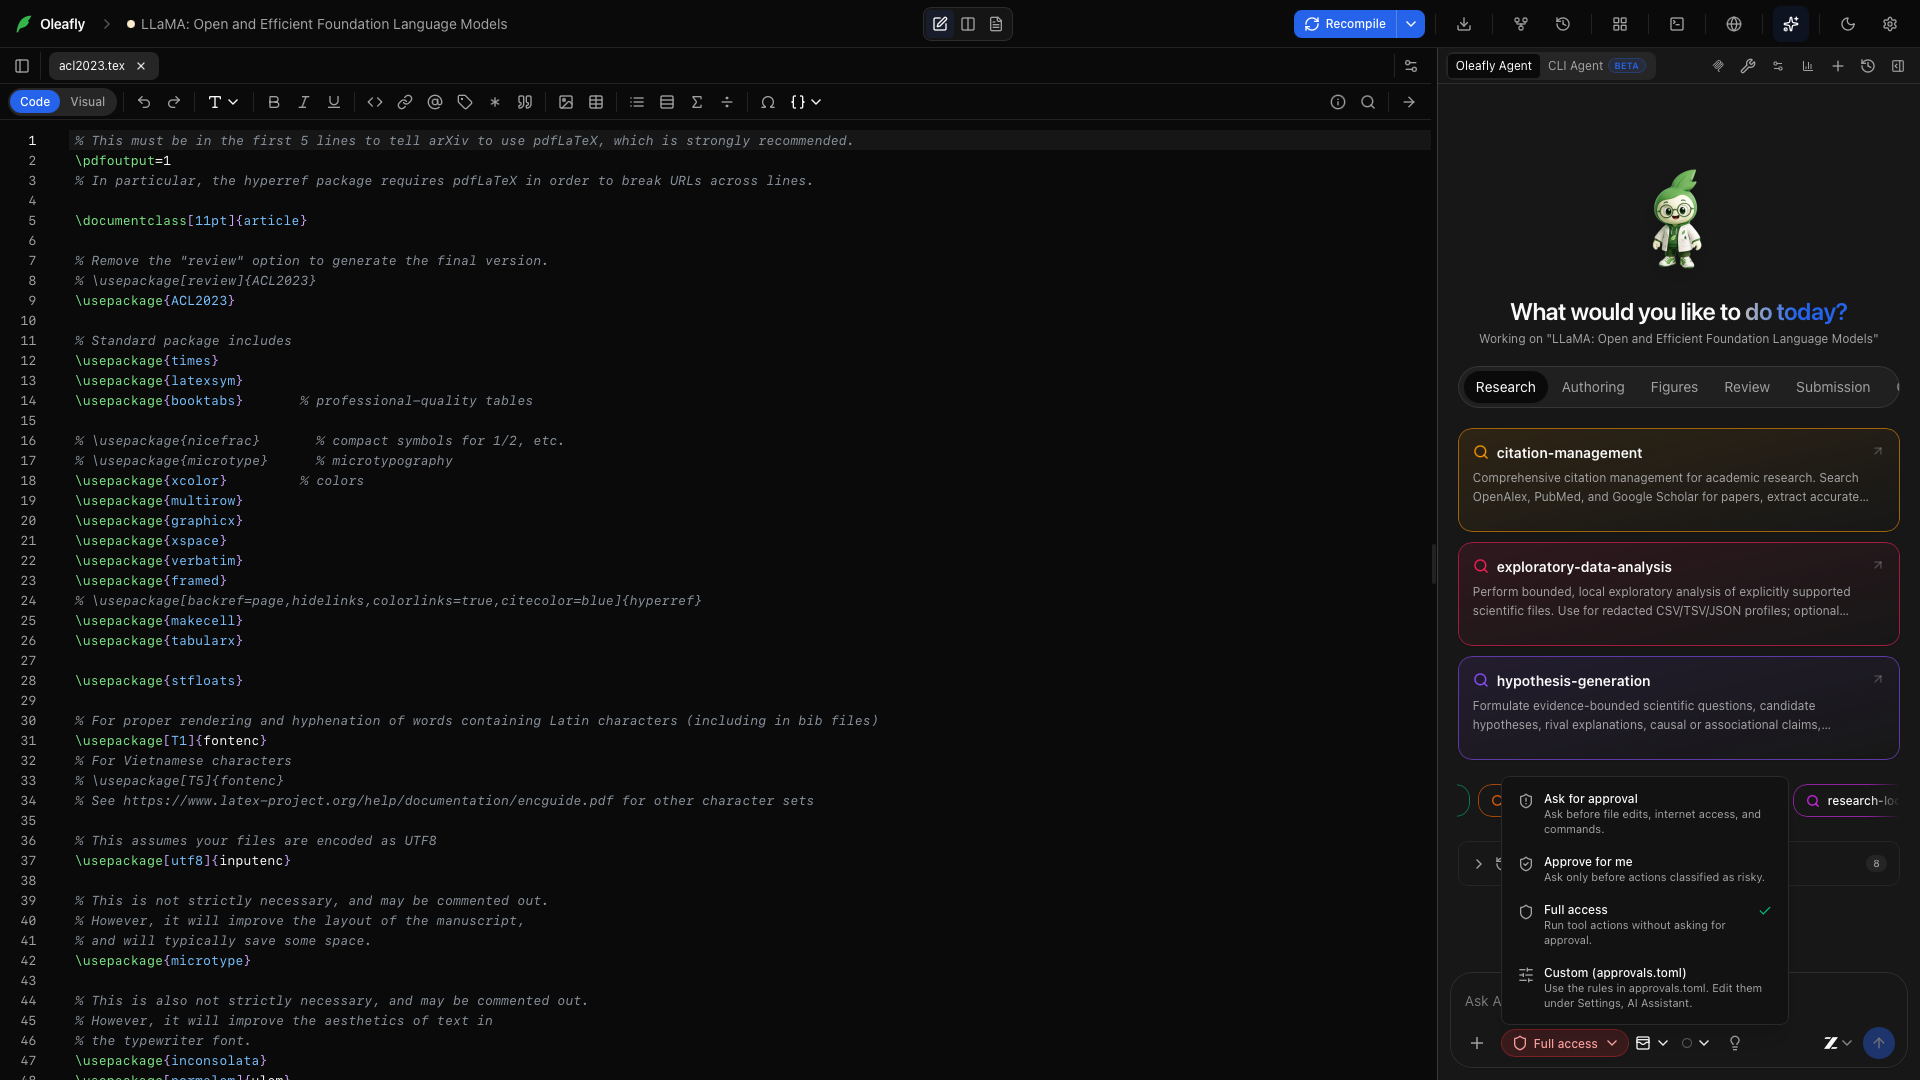
Use the approval selector in the chat composer. The choice is saved for the current project.
| Mode | Behavior |
|---|---|
| Ask for approval | Read-classified tools can run; other actions ask first |
| Approve for me | Read and network tools can run; file changes and shell commands ask first |
| Full access | Tool actions can proceed without an approval prompt |
| Custom | Saved allow/deny rules apply; tools without a rule use the standard risk policy |
Approve for me is the default. Some tools have their own checks within an operation. Compiling and inspecting a PDF are treated differently from writing a source file or executing a shell command.
Approve a proposed action
Section titled “Approve a proposed action”Read the tool name and proposed operation on the approval card. Approve to run that action, or reject it to leave the proposed change unapplied. Continue the conversation with a narrower instruction if the requested action is too broad.
Always in this project
Section titled “Always in this project”In Custom mode, use Always in this project on an approval prompt to save a rule for that tool. Check the selected mode when you expect a rule to affect the next run.
Review or remove a rule
Section titled “Review or remove a rule”With the project open, go to Settings → AI Assistant → Providers and keys and scroll to Tool approvals. Each row shows the tool name and whether it is always allowed or denied. Remove a rule to return that tool to the standard risk policy in Custom mode.
Edit approvals.toml
Section titled “Edit approvals.toml”The approvals file editor is below the provider controls. It edits ~/.oleafly/approvals.toml. Use Reload to read the current file, Discard to drop unsaved edits, or the example control to insert a starting configuration. Saving validates the TOML before applying it.
The file has a mode table and tool-rule tables keyed by project folder ID, not the display title:
["$approval_modes"]"my-project-folder-id" = "custom"
["my-project-folder-id"]write_file = "allow"replace_in_file = "allow"run_command = "deny"delete_file = "deny"
Replace my-project-folder-id with the real folder ID for your project. Mode values are ask-for-approval, approve-for-me, full-access, and custom. Tool-rule values are allow and deny. Rules are consulted in Custom mode; a missing rule uses the normal risk policy.
Use exact tool names from the catalog. Common names include write_file, replace_in_file, create_file, rename_file, delete_file, run_command, compile, insert_figure, and set_main_doc.
Which configuration file should I use?
Section titled “Which configuration file should I use?”| File | Purpose |
|---|---|
~/.oleafly/config.json | App configuration, managed through Settings |
~/.oleafly/approvals.toml | Project approval modes and per-tool rules |
~/.oleafly/agent.toml | Advanced multi-agent limits and instructions |
Your external agent’s configuration, such as ~/.codex/config.toml | That agent’s own settings and MCP connections |
Oleafly does not use a single config.toml for all these settings. Use the Settings interface for provider keys and app preferences; credentials have separate encrypted storage. Do not replace your whole app configuration with a short example.
Configure agent.toml
Section titled “Configure agent.toml”Advanced users can create ~/.oleafly/agent.toml to tune the assistant’s multi-agent settings. These settings govern Oleafly’s own agent runtime, separately from a connected CLI agent’s configuration.
maxAgentDepth = 2maxConcurrentSubagents = 8minWaitTimeoutMs = 1000maxWaitTimeoutMs = 300000defaultWaitTimeoutMs = 120000waitAgentEnabled = true
usageHintText = """Delegate independent checks with clear scopes. Keep writing decisions withthe parent agent, and close completed agents when their work is collected."""
subagentDeveloperInstructions = """Work only on the assigned task. Report the files and evidence you inspected.Do not spawn additional agents."""
maxAgentDepth
Section titled “maxAgentDepth”Limits nesting depth. The default is 2: a run’s children do not delegate further. The minimum accepted value is 1.
maxConcurrentSubagents
Section titled “maxConcurrentSubagents”Limits concurrent subagents in a session. The default is 8, and the minimum is 1. More agents can increase model usage; raise the limit for work that can actually proceed independently.
minWaitTimeoutMs
Section titled “minWaitTimeoutMs”Sets the lower bound for an agent wait, in milliseconds. The default is 1000.
maxWaitTimeoutMs
Section titled “maxWaitTimeoutMs”Sets the upper bound for an agent wait. The default is 300000, or five minutes. It is kept at or above the minimum.
defaultWaitTimeoutMs
Section titled “defaultWaitTimeoutMs”Sets the default wait duration. The default is 120000, or two minutes. Values are constrained to the configured minimum and maximum.
waitAgentEnabled
Section titled “waitAgentEnabled”Controls availability of the wait-agent capability. The default is true.
usageHintText
Section titled “usageHintText”Supplies delegation guidance to the parent agent. The example above replaces the default guidance with your own text.
subagentDeveloperInstructions
Section titled “subagentDeveloperInstructions”Supplies instructions to child agents. Use it to state scope, reporting expectations, and whether further delegation is appropriate.
The runtime also accepts snake_case versions of these keys, such as max_agent_depth. Omitted fields use defaults. A missing or malformed file falls back to defaults, so check syntax carefully and start a new run after changing configuration.
Test a rule with a small task
Section titled “Test a rule with a small task”- Open a practice project and choose Ask for approval.
- Ask: “Read the main document and propose a clearer title. Ask before changing the file.”
- Inspect the proposed change and approve or reject it.
- Review saved rules in Settings before changing to Custom mode.
- Use Plan mode when you want to agree on several steps before edits begin.
External assistants connecting through Oleafly MCP use the MCP server’s policy, which is configured separately.