
Writing in each language
Write in Typst
Turn concise source into a paper, report, or resume with a toolbar that writes Typst for you.
Este conteúdo não está disponível em sua língua ainda.
Choose a Typst template and edit its .typ source beside the compiled PDF. The toolbar inserts Typst syntax directly, so every change stays visible and editable.
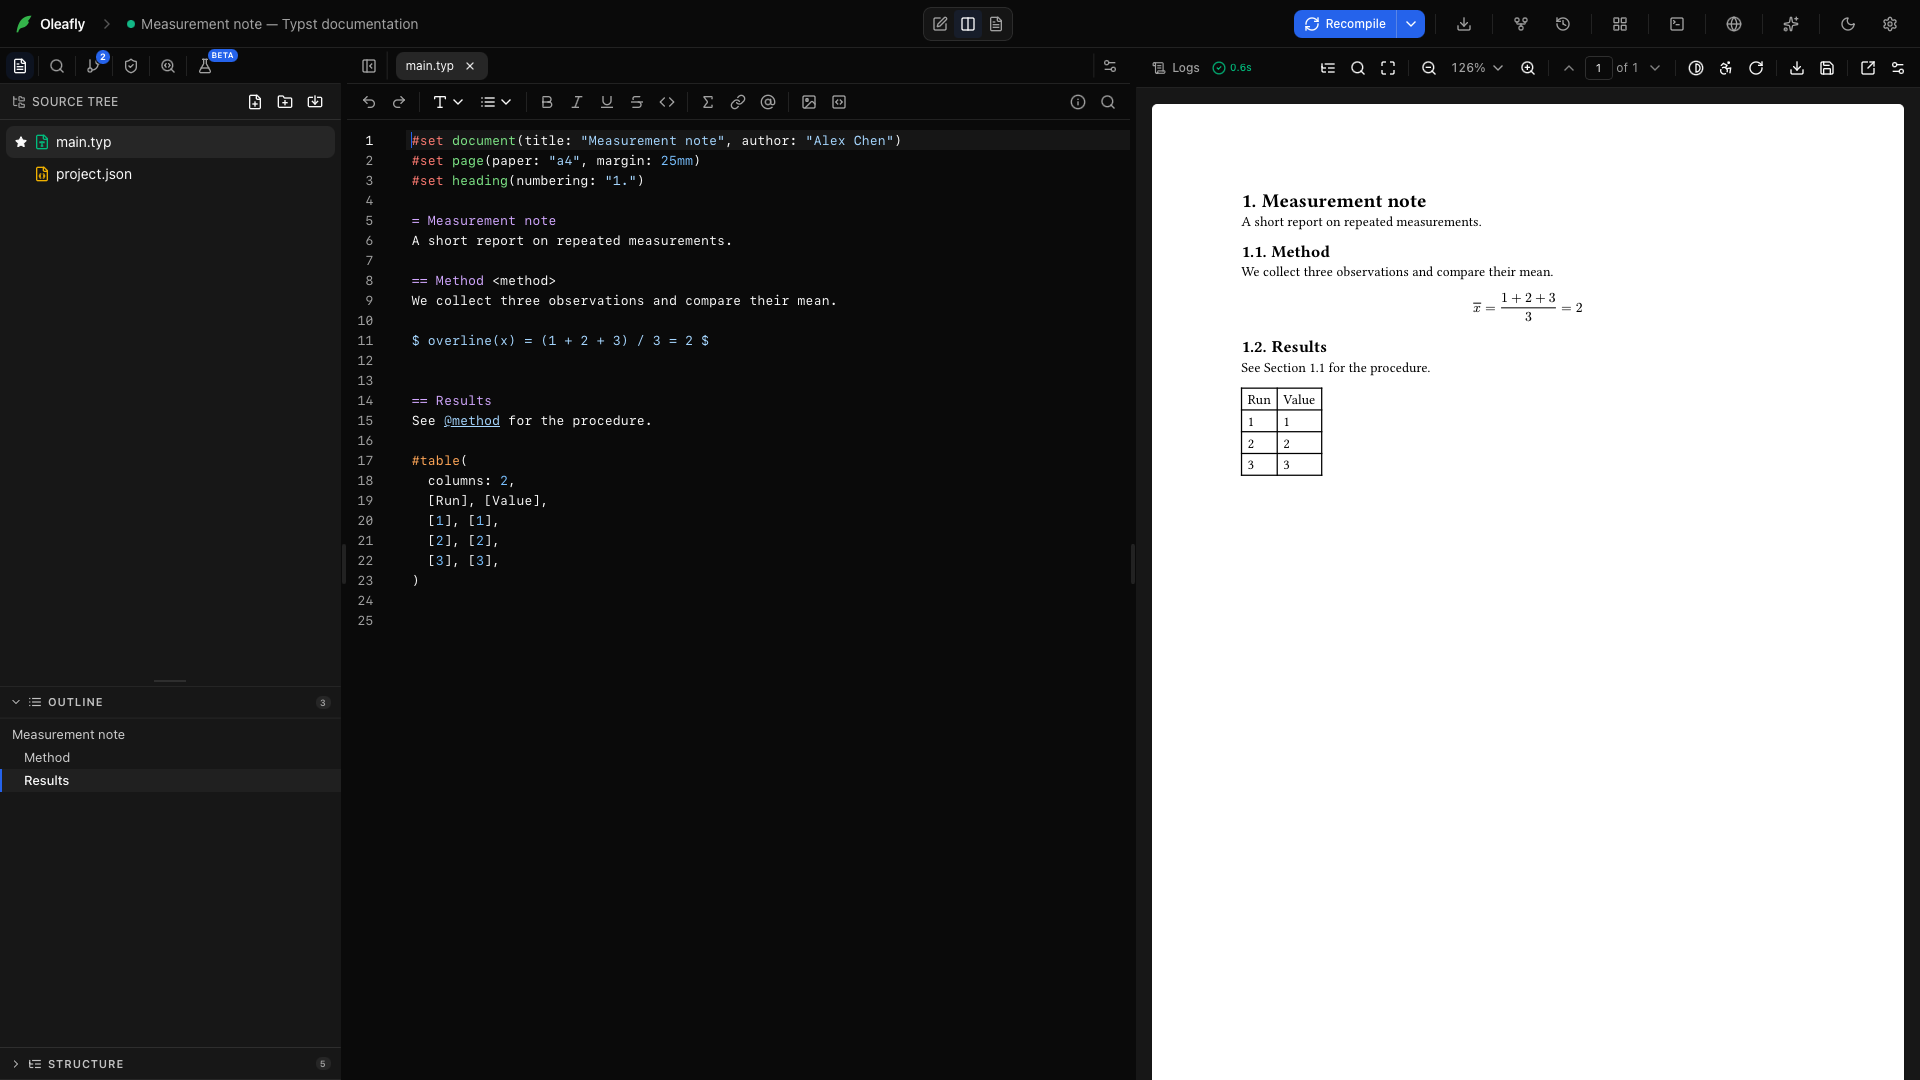
Compile a small report
Section titled “Compile a small report”- Choose New project → Use a template → Blank Typst document.
- Name it Measurement note and open
main.typ. - Paste the example below, then choose Recompile or press ⌘Enter / Ctrl+Enter.
#set document(title: "Measurement note", author: "Alex Chen")#set page(paper: "a4", margin: 25mm)#set heading(numbering: "1.")
= Measurement noteA short report on repeated measurements.
== Method <method>We collect three observations and compare their mean.
$ overline(x) = (1 + 2 + 3) / 3 = 2 $
== ResultsSee @method for the procedure.
#table(  columns: 2,  [Run], [Value],  [1], [1],  [2], [2],  [3], [3],)
The PDF should show numbered headings, a display equation, a reference to the method, and a two-column table.
Every toolbar tool
Section titled “Every toolbar tool”Select text before using a formatting tool to wrap that text. With no selection, the toolbar inserts a placeholder you can replace. Open More formatting options (…) when the editor is too narrow to show every control.
Reverse your latest edit. ⌘Z / Ctrl+Z.
Reapply an undone edit. ⌘Shift+Z / Ctrl+Shift+Z.
Heading → Title
Section titled “Heading → Title”Select a title and choose H1. = Title.
Heading → Section
Section titled “Heading → Section”Add a section within the document. == Section.
Heading → Subsection
Section titled “Heading → Subsection”Add a level below a section. === Subsection.
Heading → Subsubsection
Section titled “Heading → Subsubsection”Add a fourth-level heading. ==== Subsubsection.
Heading → Minor heading
Section titled “Heading → Minor heading”Add a fifth-level heading. ===== Minor heading.
Heading → Paragraph heading
Section titled “Heading → Paragraph heading”Add a sixth-level heading. ====== Paragraph heading.
List → Bulleted list
Section titled “List → Bulleted list”Start a list of observations. - Item.
List → Numbered list
Section titled “List → Numbered list”Start a sequence of steps. + Item.
Select “three observations”. *three observations*; ⌘B / Ctrl+B.
Italic
Section titled “Italic”Select a term to emphasize. _term_; ⌘I / Ctrl+I.
Underline
Section titled “Underline”Select a phrase. #underline[phrase].
Strikethrough
Section titled “Strikethrough”Mark an obsolete phrase. #strike[phrase].
Inline code
Section titled “Inline code”Select a filename or variable name. Surrounds it with backticks.
Select x and click the math icon. $x$; add a space after the opening $ and before the closing $ for display math.
Insert link
Section titled “Insert link”Replace url, then text. #link("url")[text].
Reference a label
Section titled “Reference a label”Replace label with method. @method, referring to <method> in the example.
Insert image
Section titled “Insert image”Import an image, then replace the selected filename with its relative path. #image("image-filename").
Code block
Section titled “Code block”Select several lines of code or replace the placeholder. A block enclosed by triple backticks. Add a language after the opening fence for highlighting.
Project information
Section titled “Project information”Open the information button. Document and selection statistics.
Search for a word in the active file. ⌘F / Ctrl+F.
Typst uses source editing. The PDF preview shows the rendered document; there is no Typst Visual mode toggle.
Add a captioned figure
Section titled “Add a captioned figure”Import plot.png into a figures folder using the file tree, then insert:
#figure(  image("figures/plot.png", width: 80%),  caption: [Measurements across three runs.],) <fig:measurements>
See @fig:measurements for the comparison.
The image toolbar inserts the image call. Wrap it in #figure(...) when you need a caption, figure number, or reference target.
Add citations
Section titled “Add citations”Place your bibliography, such as references.bib, in the project. Cite a real key with @citation-key and add the bibliography where you want the reference list:
#bibliography("references.bib")Use References & citations to find and import sources, then check the keys in the saved file. A citation key and a document label both use @ in Typst; the bibliography or label supplies the target.
Organize and export
Section titled “Organize and export”Split a long report into files and include them with #include "sections/method.typ". Keep figures and bibliography files within the project so a source ZIP travels with everything the document needs.
Compile to inspect the result, then use Export → Export as PDF or Export source (.zip). The Typst export menu offers these two paths. Compiling explains logs and engine setup; files and folders covers project organization.