
Project toolbar & layouts
Name, compile, export, and arrange a project from the top bar.
Nội dung này hiện chưa có sẵn bằng ngôn ngữ của bạn.
The project toolbar stays above the workspace. Open a practice document and use this guide to identify each action. Formatting buttons inside the editor are described separately for LaTeX, Typst, and Markdown.
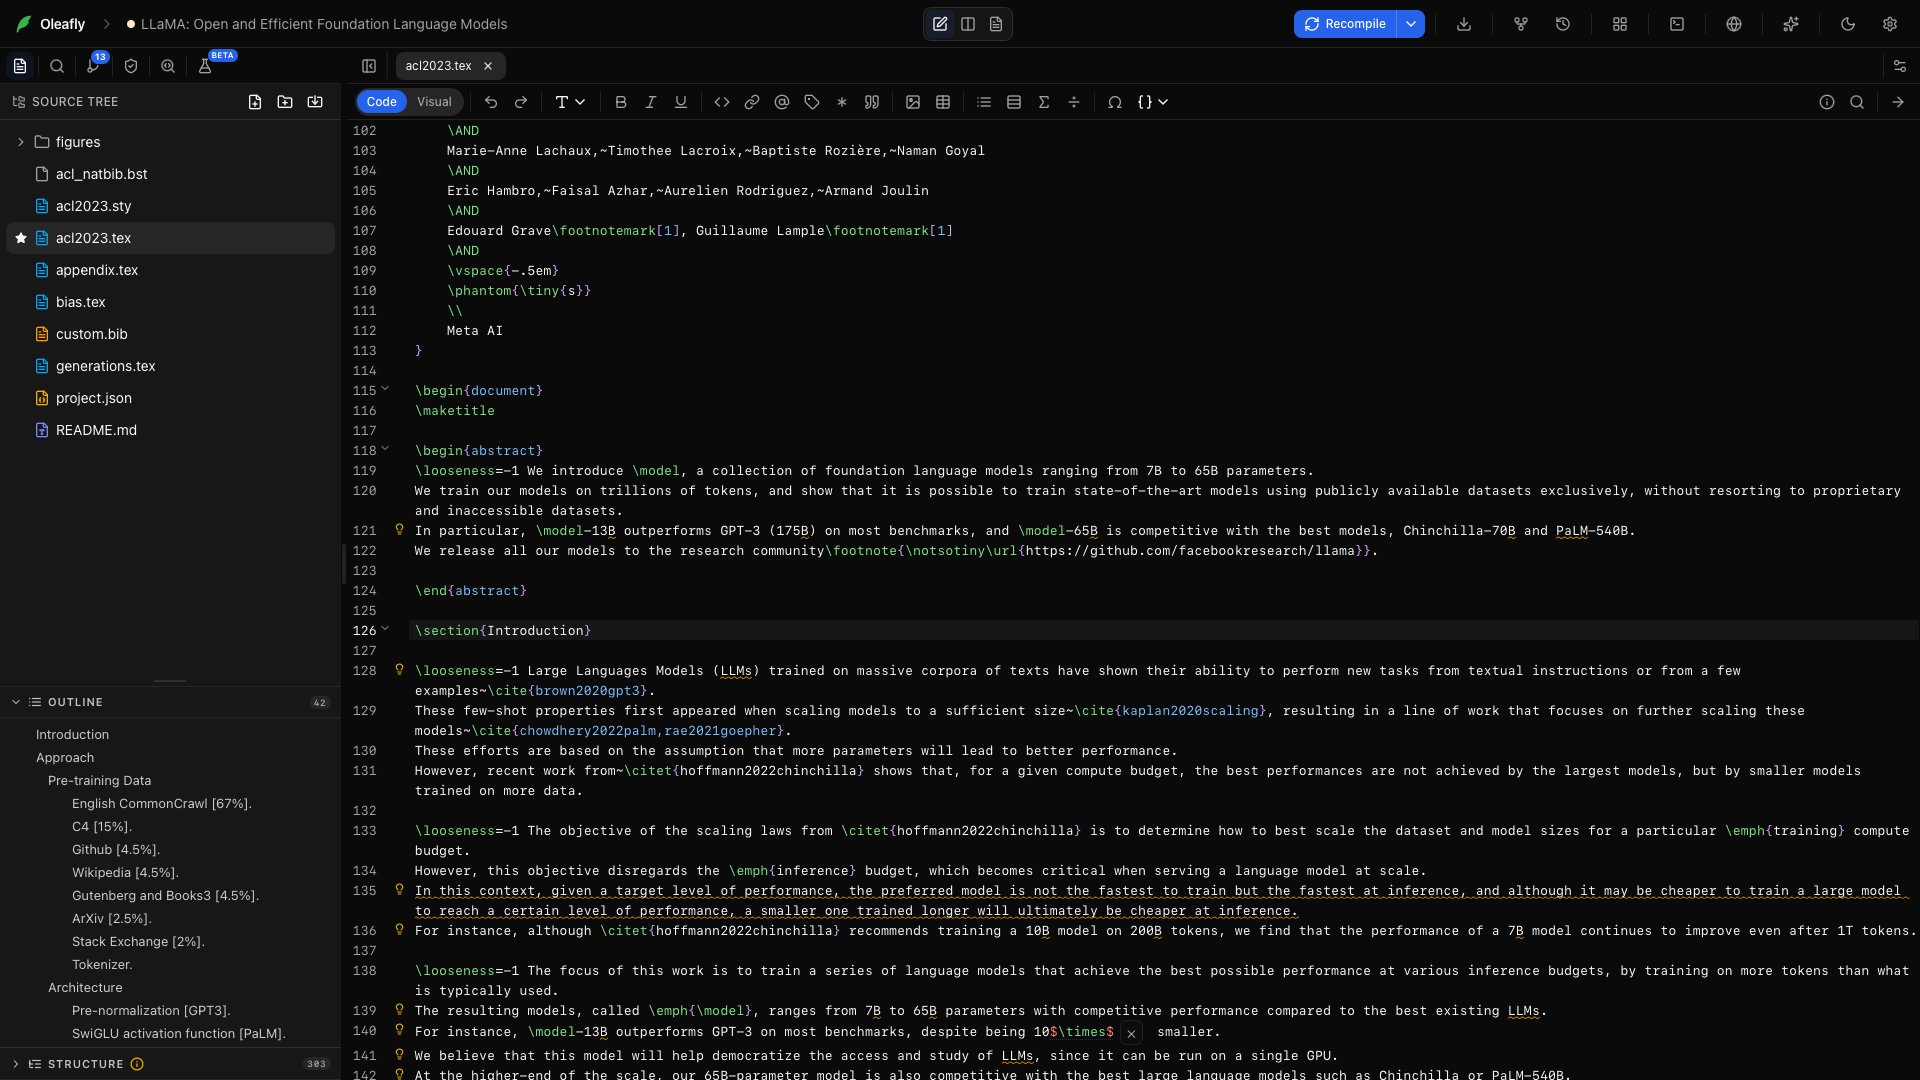
Choose Home at the left to return to the library. Reopen the project from its book or list entry when you want to continue.
Project name
Section titled “Project name”Click the current project name to edit it. Enter a descriptive name, then press Enter or choose Save name. Press Esc or Cancel to keep the previous name. The project name identifies the work in the library; renaming the main source file is a separate file-tree action.
Source View
Section titled “Source View”Choose Source View to give the document editor the main workspace. Use it for writing long passages, editing the preamble, or inspecting the complete formatting toolbar.
Split View
Section titled “Split View”Choose Split View to keep the source and preview beside each other. Drag the divider to choose how much space each pane gets. This is useful while adjusting a table, equation, or figure.
PDF View
Section titled “PDF View”Choose PDF View to read the compiled output in the main workspace. Compile first if the project has no preview yet. Use this arrangement for a full reading pass.
Recompile
Section titled “Recompile”Choose Recompile to build the current project. The result appears in the preview; failures appear in Logs. The engine determines how source becomes a PDF. See Choosing an engine and Compiling.
Compile options
Section titled “Compile options”Open the arrow beside Recompile to inspect the compiler options available for the current project. In LaTeX projects, select the compiler required by your template. Use Tectonic for a bundled setup, or a latexmk compiler when you need a traditional TeX distribution. Keep the project on the compiler you have tested before submission.
Export
Section titled “Export”Open Export to download source or a compiled result. Source as .zip packages editable project files; the PDF action saves the readable document. Conversion entries depend on the engine and document type. Follow Export formats for Word, HTML, text, presentations, and books.
Fork project
Section titled “Fork project”Choose Fork project to create another project from the current one. Enter a new name that explains the purpose, such as “Paper — shorter abstract.” Use the copy to try a different direction while keeping the original available in the library.
Versioning
Section titled “Versioning”Open Versioning to inspect saved versions and recovery options. Saved checkpoints record successful builds; Git history records commits you control. Choose the kind of history that matches the work you want to recover.
Layout
Section titled “Layout”Open Layout to choose one of seven arrangements. A layout changes which editor, preview, and assistant panes are shown. It does not change the manuscript.
Editor + Preview + AI
Section titled “Editor + Preview + AI”Show the source, compiled page, and assistant together. Use it for a focused revision followed by a compile. On a smaller display, widen the pane you are using or choose a two-pane arrangement.
Editor + Preview
Section titled “Editor + Preview”Keep the source and PDF together. This is a useful layout for ordinary writing and page-layout work.
Editor + AI
Section titled “Editor + AI”Give the source and assistant more space. Use it to discuss a section, review a proposed edit, or work through a compiler error before reopening the PDF.
Preview + AI
Section titled “Preview + AI”Keep the rendered page beside the assistant. Use it to discuss an awkward figure placement or ask for a visual layout check with a model that supports page images.
Editor Only
Section titled “Editor Only”Use the full workspace for source editing. This exposes more toolbar controls at once and makes long lines easier to read.
Preview Only
Section titled “Preview Only”Read the finished document with fewer distractions. Use PDF search, the document outline, page navigation, and reader view during the review.
AI Only
Section titled “AI Only”Give the assistant the workspace. Use it for planning or a longer research conversation, then reopen the source to inspect the resulting work.
Terminal
Section titled “Terminal”Choose Show terminal or press Ctrl+` to reveal the project’s shell. Hiding the panel is different from closing its terminal session. See Terminal for tabs, commands, and output.
Browser
Section titled “Browser”Choose Open browser to open Oleafly’s browser window. Enable Settings → Experimentation → Web browser if the button is absent. See Browser for tabs, navigation, and research use.
AI assistant
Section titled “AI assistant”Choose Show AI assistant to open or hide the assistant pane. The assistant’s model, approval, attachment, prompt, and conversation controls are explained in Chat, plans & tools.
Appearance
Section titled “Appearance”Use Appearance to switch the interface theme while writing. For fonts, colors, PDF defaults, and terminal styling, open Appearance settings.
Settings
Section titled “Settings”Choose the gear to open Settings. The settings catalog links each section to its controls and setup procedures.
Find controls in a narrow window
Section titled “Find controls in a narrow window”Toolbars adapt to the available width. If a control is absent, inspect its overflow menu or widen the pane. Editor formatting, preview controls, and the top project toolbar each have their own responsibilities; changing a document’s view does not remove its features.